
In golf courses or Major League Baseball fields, creating those striking lawn stripes is relatively easy. No matter the size of your lawn, striping your grass is a simple task as long as you follow a plan. Groundskeepers and field managers in professional sports arenas often have a complex mowing schedule, but you can easily apply their two-tone grass strategies to your own lawn. Here’s everything you need to know about mowing stripes on your lawn.
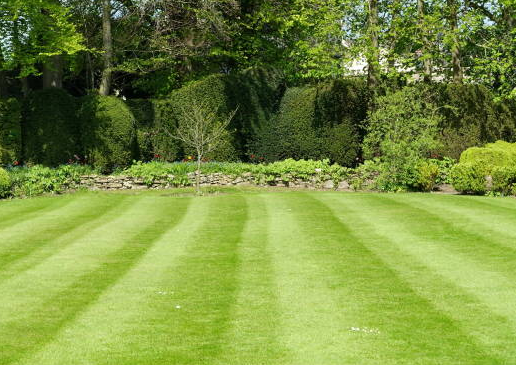
The Secret Behind Lawn Stripes
The essence of the stripes lies in how light hits the grass blades. When light hits the grass blades that are bent away from you, they appear lighter. When light hits the blades that are bent toward you, they appear darker. The contrast between light and dark is what creates the high-quality striped effect. Achieving this is simply a matter of bending the grass blades in a specific direction to reflect light in the right way.
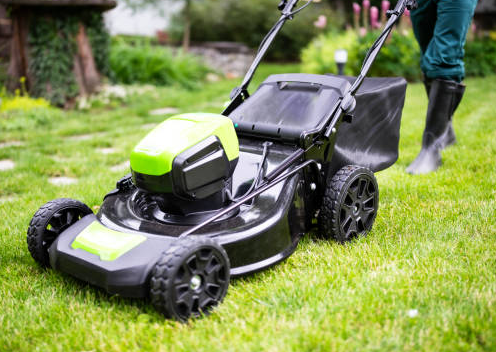
Professional field managers use commercial mowers equipped with special rollers to create the stripes. The good news is that you can achieve almost the same effect with a regular lawn mower. Most mowers come with a safety shield at the back of the mower platform to protect the operator from flying debris. This shield works similarly to a roller, bending the grass slightly as it passes. Alternatively, you can use a striping kit to enhance the effect.
How to Create Lawn Stripes
-
Choose Your Mowing Direction
Start by deciding the linear direction in which you want to mow your lawn. It could be north to south or diagonally—it doesn’t matter. The key to creating neat stripes is consistency in direction. -
Mow Alternating Directions
If you mow from north to south for your first pass, mow from south to north for the second pass. Continue mowing back and forth in this organized way, making sharp turns at the end of each strip. When starting the next strip, begin from where you left off, making sure to slightly overlap the last cut to avoid any gaps. -
Attention to Detail
Pay attention to the edges of your lawn. Leave enough space around the edges to make a smooth turn when starting the next stripe. Some people prefer to mow the perimeter of the lawn first to create a clean border, making it easier to turn the mower around. -
Work Around Obstacles
Mowing near trees and flower beds can be tricky. Be sure to leave enough space around them to avoid causing long-term damage to trees and shrubs. Plan your exits carefully to avoid walking over the fresh stripes and ruining your hard work.
Going Beyond Stripes: Checkered Patterns
Once you master the art of mowing stripes, why not try creating a checkerboard pattern? While it takes a bit more time on golf courses and baseball fields, it’s actually quite easy to achieve at home. Simply mow your lawn with stripes in one direction, then mow perpendicular to them (90 degrees) to create a checkered pattern.
For example, if you mowed from north to south last time, mow from east to west this time. This will give you a beautifully intricate checkerboard pattern.
Changing Stripe Patterns
Repeatedly mowing the same pattern can put stress on your lawn. Mowing along the same paths too often will compact the soil, which inhibits grass growth as the roots struggle to access water and nutrients. Additionally, turning the mower in the same spot every time can create tire tracks and damage the lawn.
To keep your lawn healthy, change up the stripe pattern every time you mow. For example, mow from north to south for a few times, then switch to mowing along the diagonal. Keep alternating the patterns throughout the growing season to avoid stressing the grass.
With these simple tips, you can create beautiful, professional-looking lawn stripes every time you mow. Rotate your patterns, vary your mowing directions, and your lawn will stay vibrant and healthy throughout the season!